Teaching Culture to Novice Language Learners

 Teaching culture to novice learners is hard. They just don't have the language background to go very deep at all into a topic in the target language. It is normal then to want to not use the target language. It happens to me too too. But just as often I teach culture in the target language.  Here are some ideas for how...    (Want to skip right to the freebie? Grab it here.)
1. Use video. All the visuals you can see in a video help students understand the language. Or maybe you don't even need the video sound. Turn the sound off and talk along with the video using language your students do understand. Use your own videos or videos filmed by family and colleagues. Or search for videos on sites like youtube or teacher tube. I usually use a site like safeshare to choose a small section of the video for viewing and to stop students from seeing ads.

2. Do a short and easy cooking project. You can demonstrate how to make something using language your students understand and holding up the ingredients to help make it comprehensible. Depending on the recipe, you can also have your students participate in making the food. You can make salsa, arepascrêpes, European sipping hot chocolate (the kind served with churros in Spain, at Angelina's in France & at Artefact in Quebec) or ask families to bring in cheeses from France, Spain... for cheese tasting.

3. Have a mini holiday celebration. It doesn't even HAVE to be at the correct time of year. Decorate the classroom as if it were Bastille Day in May (or whenever). Bring in typical foods or photos. Show them to the class while talking about them in simple comprehensible language they can understand. Sure, you can dig deeper into talking more about the celebration and what it is all about in English - but you can do that another day. Today is all about actually celebrating and using the target language.

4. Use a lot of pictures, images, drawings, etc. of the target culture. The picture gives a context and makes language comprehensible. Use small chunks of language to talk about what you can see in this country (or city), what you can eat and what you can visit. I like to compile the pictures and small chunks of language into a comprehensible reader. Make them yourself, or grab a few I've made & have in my TpT store. I have them for many French-speaking countries and cities and all Spanish-speaking countries

I've also created a free printable for you to use as you teach culture in the target language in your French or Spanish class. Grab the freebie here!

Quebec Canada Country Study Reader | Printable & Boom Cards w Audio | françaisEspaña Spain Country Study Reader Printable & Boom Cards with audio | españolParis France Country Study Reader | Printable & Boom Cards with Audio | françaisPuerto Rico Country Study Reader Printable & Boom Cards with audio | español


Storytelling Lessons and Student Involvement using Questioning in the Target Language

 I read stories in my language classes as often as possible. It is a great way to provide comprehensible input for novice learners. Each page is a small chunk of language with an image or illustration to aid in comprehension.

But I never just read a story to my students. I am constantly involving them in the story using questioning in the target language.

Here is how…

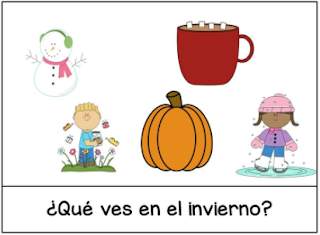
In this example lesson, my focus is on the seasons vocabulary. I want to repeat the seasons vocabulary as much as I can to help students acquire these new words.

I am using Nearpod to present my story (if you want to learn how to use Nearpod, get my how to guide here), but you can also do this questioning verbally while holding a storybook in your hands in front of the class.

The first page of my story presents the season with an image to illustrate. I read the page and then I start brainstorming … how can I repeat the seasons vocabulary word in a question they will understand and know how to respond to?


My students know the weather vocabulary well. I decide to ask about the weather.

I have different types of questioning I can do.

Question type 1:  I can ask a yes / no question. This is a great way for students to demonstrate comprehension without having to say much in the target language. This works well if they don’t have the language ability to respond to a question where a full response is necessary.


(the microphone just let's them know they can shout out the answer)

Question Type 2:  I can ask an either / or question. Often my students know an answer to a question … it is on the tip of their tongues … but they can’t quite get it out. An either / or question leads them to success! Success gives them a happy, I can do it! feeling. They will feel more comfortable in my lessons and with responding to questioning in the future when they feel successful.

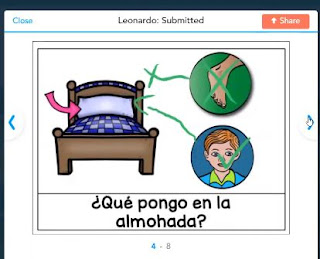
Question Type 3: I can have the students respond physically to questions. They can gesture or point or hold things up to provide a response. In Nearpod I have the students circle things using a Draw it slide. They are demonstrating comprehension of the question and have more exposure to the season vocabulary word.


     Question Type 4: I can ask a question which requires a full answer in the target language. I do this when I am confident the students know this vocabulary well enough to be able to provide a full response. BUT … if I see them struggle a bit and can tell it is on the tip of their tongues but they can’t quite get it out, I will switch to an either / or or yes / no question to help them out.


Ready to try out a storytelling lesson? Check these out...


Writing Simple Stories for Novice Language Learners


It is next to impossible to find stories in the target language that don't have odd vocabulary or advanced grammar structures my novice language learners will not understand.

So I write my own stories for my students!

First, start with your current focus. In my example story, my students were learning emotion vocabulary words like surprised, afraid, happy...

Next I put lists of what my students have already learned on my desk and I begin to design a story. I decided to use family vocabulary and to have different family members feeling a certain emotion. 


Then I wanted to bring in previously learned vocabulary to explain why this family member felt this way.

I spent time on this part and brought in a lot of previously learned vocabulary - in part to add to the storytelling. And in part because language learners need to recycle back to previously learned vocabulary so they don't forget it!

I love to get a little silly...

Because someone in my story needed to feel surprised. My students know some farm animals and some bedroom vocabulary. Finding a cow on your bed is certainly a reason to feel surprised! And my students love the silliness!!


Do you love writing stories as much as I do?

If you are not sure and would like to take a look at one of mine, I have one to share!

Comprehensible Input with Nearpod for eLearning and Distance Learning

I started using Nearpod to create lessons last spring. It is so much fun to use that I really look forward to creating the lessons! And my students love them even more than I do!


I use the Nearpods live for instruction through Zoom. But you can also create lessons students can use on their own. Click here for the how to guide.

My favorite thing to do in Nearpod is start with a story and then add interaction much like you might do when reading a story in person to a class.

Here's a short peek ...


Let's start small with some basic and easy steps.

First create your Nearpod account.

Now start creating your first lesson. 
I use the lesson in Nearpod button so click that.


Now you'll upload your files. If you are using a story from my store, you can upload the PDF and then delete the pages (cover, TOU, etc) you do not want to use with your students.

Choose individual slides.

Now click on the pages you want to delete (for example, the cover page) and then click on delete slide.

Next, decide if you will read the story live (which is what I do), or if you will record the audio for students to listen on their own.

I have recorded the audio before and it is really very easy.


Click on the audio icon.


Click on the red microphone and begin speaking.
Click save when you are finished with the audio for this page.
Continue recording all of the pages of your story.

Once you have your story in Nearpod, you are ready to add activities so the students are participating and not just listening.

I recommend starting with just a few simple Nearpod activities. Then try out something you've never tried before the next time you sit down to create a lesson. Students will be more engaged when you have something different than they've ever done before. And also it will be less overwhelming if you start small and then learn something new each time you create.

So let's start first with the draw it activity you just saw in my video example above.

Draw it is perfect for early language learners. You are staying in the target language and your students are responding to yes/no or either or questions. Let's go through the steps of creating a draw it...

First create your slide with your question and response options. I like to use power point and then I save my power point slide as a jpeg file.

Once your slide has been created and saved as a jpeg, you are ready to add it to your lesson.
Click on add slide.

Now click on Activities and then on Draw it.


Upload the image file you created for your Draw it by dragging and dropping into the circle, or click on upload files and attach your image file.


You can give it a title or add audio if you'd like. I don't do either since I've already typed the text I need directly onto my image. And I read my Nearpods out loud during the Zoom lessons. But you have options to make it work best for you!


The activity is added at the end of your lesson. You'll just click to select it and then drag it to wherever you want the activity to appear in your lesson.


Your students will be able to circle and/or write on the draw it slide.
Here is another example:
And an example of a student's completed Draw it:

Of course you can also add question slides to your story and have the students respond verbally.


I learned through practice that it is a good idea to add a microphone icon to pages when I'd like students to respond verbally. I can cue them to use the mic in Zoom without saying "would anyone like to take the mic?" And it also discourages what would be "shouting out" in the classroom when students take the mic & interrupt. If there is no mic icon on the page, there should be no talking!

Another simple interaction to use in your first lessons is the collaborate activity.

Go to Add a slide and click on Activities and then on Collaborate.


You can change the background colors by clicking on the examples under where it says Choose a Style.
Where it says Enter Topic, I type a question.
Usually I leave the Enter description field blank, but you can enter more information there if you'd like.


Here is an example from a Nearpod lesson I made from my French Cheese story:


And an example from a Nearpod lesson about the house:


Try creating your own story that is JUST RIGHT for your students! You can find the days of the week stories in French and Spanish in my TpT store for free.

If you'd like a longer story to use, get the simplified Stone Soup reader in Spanish & French.


Try it out! I think you'll love Nearpod too! If you need more help with Nearpod, I made some mini videos to help you. Click here for the how to guide.


(other stories used in this post are my French Cheese story in English and French and my house story in Spanish and French)