Comprehensible Input with Nearpod for eLearning and Distance Learning

I started using Nearpod to create lessons last spring. It is so much fun to use that I really look forward to creating the lessons! And my students love them even more than I do!


I use the Nearpods live for instruction through Zoom. But you can also create lessons students can use on their own. Click here for the how to guide.

My favorite thing to do in Nearpod is start with a story and then add interaction much like you might do when reading a story in person to a class.

Here's a short peek ...


Let's start small with some basic and easy steps.

First create your Nearpod account.

Now start creating your first lesson. 
I use the lesson in Nearpod button so click that.


Now you'll upload your files. If you are using a story from my store, you can upload the PDF and then delete the pages (cover, TOU, etc) you do not want to use with your students.

Choose individual slides.

Now click on the pages you want to delete (for example, the cover page) and then click on delete slide.

Next, decide if you will read the story live (which is what I do), or if you will record the audio for students to listen on their own.

I have recorded the audio before and it is really very easy.


Click on the audio icon.


Click on the red microphone and begin speaking.
Click save when you are finished with the audio for this page.
Continue recording all of the pages of your story.

Once you have your story in Nearpod, you are ready to add activities so the students are participating and not just listening.

I recommend starting with just a few simple Nearpod activities. Then try out something you've never tried before the next time you sit down to create a lesson. Students will be more engaged when you have something different than they've ever done before. And also it will be less overwhelming if you start small and then learn something new each time you create.

So let's start first with the draw it activity you just saw in my video example above.

Draw it is perfect for early language learners. You are staying in the target language and your students are responding to yes/no or either or questions. Let's go through the steps of creating a draw it...

First create your slide with your question and response options. I like to use power point and then I save my power point slide as a jpeg file.

Once your slide has been created and saved as a jpeg, you are ready to add it to your lesson.
Click on add slide.

Now click on Activities and then on Draw it.


Upload the image file you created for your Draw it by dragging and dropping into the circle, or click on upload files and attach your image file.


You can give it a title or add audio if you'd like. I don't do either since I've already typed the text I need directly onto my image. And I read my Nearpods out loud during the Zoom lessons. But you have options to make it work best for you!


The activity is added at the end of your lesson. You'll just click to select it and then drag it to wherever you want the activity to appear in your lesson.
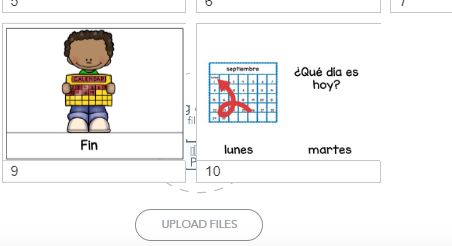

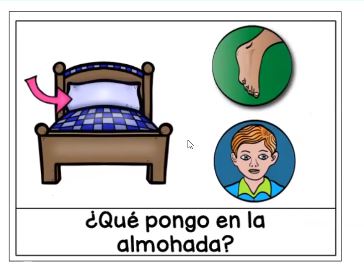
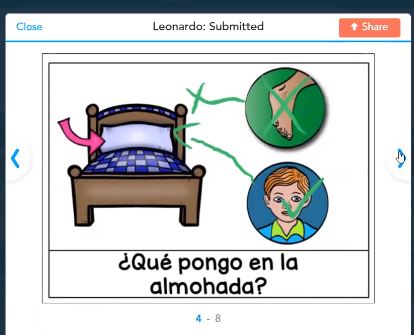
Your students will be able to circle and/or write on the draw it slide.
Here is another example:
And an example of a student's completed Draw it:
Of course you can also add question slides to your story and have the students respond verbally.


I learned through practice that it is a good idea to add a microphone icon to pages when I'd like students to respond verbally. I can cue them to use the mic in Zoom without saying "would anyone like to take the mic?" And it also discourages what would be "shouting out" in the classroom when students take the mic & interrupt. If there is no mic icon on the page, there should be no talking!

Another simple interaction to use in your first lessons is the collaborate activity.

Go to Add a slide and click on Activities and then on Collaborate.


You can change the background colors by clicking on the examples under where it says Choose a Style.
Where it says Enter Topic, I type a question.
Usually I leave the Enter description field blank, but you can enter more information there if you'd like.


Here is an example from a Nearpod lesson I made from my French Cheese story:


And an example from a Nearpod lesson about the house:


Try creating your own story that is JUST RIGHT for your students! You can find the days of the week stories in French and Spanish in my TpT store for free.

If you'd like a longer story to use, get the simplified Stone Soup reader in Spanish & French.


Try it out! I think you'll love Nearpod too! If you need more help with Nearpod, I made some mini videos to help you. Click here for the how to guide.


(other stories used in this post are my French Cheese story in English and French and my house story in Spanish and French)


Let's travel to a French-speaking city! ~ Paper bag suitcase craftivity

Today we are making a suitcase craftivity and planning a trip to a French-speaking city! We are sneaking some writing practice and cultural information into this fun craft.
First, take a paper bag and fold it into thirds. Now tape or glue an index card into each section of the folded bag. You can have the index cards pre-printed with the start of each sentence (like mine below), or you can have the students copy the text onto the cards themselves. Next, have the students complete the sentences.

Now it is time to decorate!
I used a paper fastener to close my example suitcase. You can also use velcro circles. Students can create a handle to the suitcase by trimming the edge of the paper bag or using construction paper. Finally, they will decorate the suitcase using markers and stickers.
Enjoy!
I was inspired by Inner Child Fun's blog post.
 French-speaking city & country readers


Let's travel to a Spanish-speaking country! ~ Paper bag suitcase craftivity

Today we are making a suitcase craftivity & planning a trip to a Spanish-speaking country! We are sneaking some writing practice & cultural information into this fun craft.

First take a paper bag and fold it into thirds. Now tape or glue an index card into each section of the folded paper bag. You can have the index cards pre-printed with the start of each sentence (like mine below), or you can have the students copy the text onto the cards themselves. Next have students complete the sentences.
Now it is time to decorate!
I used a paper fastener to close my sample suitcase. You can also use a velcro circle.
Students can create a handle to the suitcase by trimming the edge of the paper bag, or using construction paper.  Finally, they will decorate the suitcase using markers and stickers.

Enjoy!
I was inspired by Inner Child Fun's blog post
 country readers


El día de los muertos ~ 5 Day of the Dead Classroom Activities


El Día de los Muertos is just around the corner. Here are five activity ideas for your classroom!


1. Make QUICK and SIMPLE {make in 20 minutes!} sugar candy skulls!


2. Want even more sugary treats? These marshmallow sugar skull pops by mom.me are sooooo pretty!

3. Learn what the Day of the Dead is all about. Then complete a sorting activity for what is typical & what is not typical on the Day of the Dead.

4. Let the students face paint Day of the Dead faces on each other. Here is an easy tutorial from mom.me.

5. Or if you prefer something less messy, make paper plate Calavera masks.

What's your favorite classroom Day of the Dead activity? Comment below!

Hispanic Heritage Month Activity Freebie & Bulletin Board Idea!

I'm excited to share this fun Hispanic Heritage Month activity with you! It is super fun and will get your students talking about important Hispanic Americans. You can download the activity here.

Print pages 1 and 2 front to back. You'll need one for each student. Have the students fold along the solid line (see #1 below). Next, have them open the page back up & cut along the dotted lines (see #2 below). Now have the students choose a famous Hispanic American and complete the clue sentences inside the paper (see #3 below).


Now provide each student with a copy of page 3 of the download. Have them glue, tape, or staple their clues to the right side of the ¿Quién soy yo? page. (See #4 below)


Print pages 4 & 5 of the download front to back. Fold the page down the middle & cut down the dotted line. You will give one "Me llamo" slip to each student. They will open the slip and write the name of the famous Hispanic American they chose to describe inside (See #5 below).


Have the students glue or staple their "Me llamo" slips on the inside of the last clue. They will want to attach it to the left side, without covering up the text of that last clue (see #6 below).


And now you are ready to play! You can have one student come up to the front of the class and begin to open and read each clue while the class tries to guess who it is. Or you can have the students pair up & work together to try to figure out who is being described. 

After everyone has finished the activity, they can draw on and color the person outline to illustrate who it is they used for their ¿Quién soy yo? page. The completed products make a great Hispanic Heritage month bulletin board!


Spanish Class Back to School Freebie Treasures

As promised ... the treasure hunting results for Spanish classes!


The new school year is just around the corner and I'm starting to think about lesson planning. I've spent some time treasure hunting for start of the school year freebies and I'm sharing the treasures I've found!

Today I will be sharing the goodies I've found for my Spanish classes. Last week I shared what I found for my French classes.

Let's start with one of my freebies. It is an All About Me Build-A-Book! Novice learners can cut and paste. Students ready to write on their own can just write on the pages of the book. The students will end up with a mini story book all about them that they can present to the class or read with a partner/in small groups. Find it here.


I love playing Find Someone Who at the start of a school year. It is another great way to learn about our classmates. I like this freebie from el Mundo de Pepita.


I always give my students Spanish names. I just love this back to school name activity by El Tesoro del saber. It is such a cute activity for working with learning new names.


I'll be ready to work with greetings and this greeting game resource from el Mundo de Pepita will make it so much fun!

I'll want to review colors and classroom vocabulary, so I've printed out this freebie from Peg Hutson.

And as I continue working with classroom vocabulary, I'll be excited to use this Spanish Back to School Mini Book from Doodles and Kreations. What an awesome freebie!


And I have one more of my freebies to share. My days of the week reader will get your students reading and talking all about what they do each day of the week. Find it here!


I hope these treasures help you get off to a great new school year!

French Class Back to School Freebie Treasures

The new school year is just around the corner and I'm starting to think about lesson planning. I've spent some time treasure hunting for the start of the school year freebie resources and I want to share the treasures I've found!

Today I will be sharing the goodies I've found for my French classes. Stay tuned for some Spanish class treasures! Coming soon!!

Let's start with one of my freebies. It is an All About Me Build-A-Book! Novice learners can cut and paste. Students ready to write on their own can just write on the pages of the book. The students will end up with a story book all about them that they can present to the class or read with a partner/in small groups. Find it here.


I love playing Find Someone Who at the start of a school year. It is another great way to learn about our classmates. I like this freebie from Dans la classe de Mme Sandra.
Mme Sandra also has another Find Someone Who for older learners & I spied an "I have/who has" game with a back to school theme too. Check out her store!

I just adore these get-to-know-you dice by for French Immersion. The students write questions on the dice and then they work in pairs, rolling the dice and answering questions. For novice learners, the teacher can write the questions and just have the students roll & ask/answer questions.

Students love to share what they did over the summer. And it is yet another way to get to know one another a little better. Check out this back to school writing activity from Mme McIntosh. I know my students will love sharing about their summer adventures!

Moving away from learning about each other and on to working with the French language and school related vocabulary, this Back to School Puzzle by Les petits singes de Mlle W looks like so much fun! Grab it here.

And I have one more of my freebies to share. My days of the week reader will get your students reading and talking all about what they do each day of the week. Find it here!

I hope these treasure help you get off to a great new school year!