

I use the Nearpods live for instruction through Zoom. But you can also create lessons students can use on their own. Click here for the how to guide.
My favorite thing to do in Nearpod is start with a story and then add interaction much like you might do when reading a story in person to a class.
Here's a short peek ...
Let's start small with some basic and easy steps.
First create your Nearpod account.
Now start creating your first lesson.

I use the lesson in Nearpod button so click that.

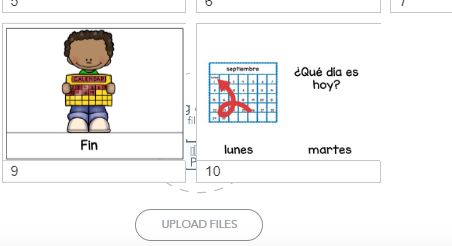
Now you'll upload your files. If you are using a story from my store, you can upload the PDF and then delete the pages (cover, TOU, etc) you do not want to use with your students.

Choose individual slides.

Now click on the pages you want to delete (for example, the cover page) and then click on delete slide.
Next, decide if you will read the story live (which is what I do), or if you will record the audio for students to listen on their own.
I have recorded the audio before and it is really very easy.

Click on the audio icon.

Click on the red microphone and begin speaking.
Click save when you are finished with the audio for this page.
Continue recording all of the pages of your story.
Once you have your story in Nearpod, you are ready to add activities so the students are participating and not just listening.
I recommend starting with just a few simple Nearpod activities. Then try out something you've never tried before the next time you sit down to create a lesson. Students will be more engaged when you have something different than they've ever done before. And also it will be less overwhelming if you start small and then learn something new each time you create.
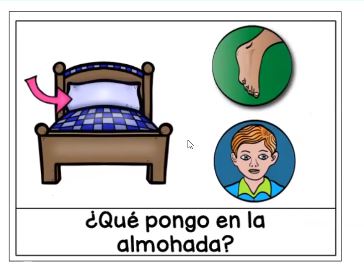
So let's start first with the draw it activity you just saw in my video example above.
Draw it is perfect for early language learners. You are staying in the target language and your students are responding to yes/no or either or questions. Let's go through the steps of creating a draw it...
First create your slide with your question and response options. I like to use power point and then I save my power point slide as a jpeg file.

Once your slide has been created and saved as a jpeg, you are ready to add it to your lesson.
Click on add slide.

Now click on Activities and then on Draw it.

Upload the image file you created for your Draw it by dragging and dropping into the circle, or click on upload files and attach your image file.

You can give it a title or add audio if you'd like. I don't do either since I've already typed the text I need directly onto my image. And I read my Nearpods out loud during the Zoom lessons. But you have options to make it work best for you!

The activity is added at the end of your lesson. You'll just click to select it and then drag it to wherever you want the activity to appear in your lesson.
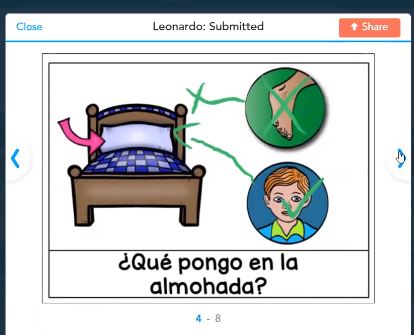
Your students will be able to circle and/or write on the draw it slide.
Here is another example:
And an example of a student's completed Draw it:
Of course you can also add question slides to your story and have the students respond verbally.

I learned through practice that it is a good idea to add a microphone icon to pages when I'd like students to respond verbally. I can cue them to use the mic in Zoom without saying "would anyone like to take the mic?" And it also discourages what would be "shouting out" in the classroom when students take the mic & interrupt. If there is no mic icon on the page, there should be no talking!
Another simple interaction to use in your first lessons is the collaborate activity.
Go to Add a slide and click on Activities and then on Collaborate.

You can change the background colors by clicking on the examples under where it says Choose a Style.
Where it says Enter Topic, I type a question.
Usually I leave the Enter description field blank, but you can enter more information there if you'd like.

Here is an example from a Nearpod lesson I made from my French Cheese story:

And an example from a Nearpod lesson about the house:

Try creating your own story that is JUST RIGHT for your students! You can find the days of the week stories in French and Spanish in my TpT store for free.
If you'd like a longer story to use, get the simplified Stone Soup reader in Spanish & French.
Try it out! I think you'll love Nearpod too! If you need more help with Nearpod, I made some mini videos to help you. Click here for the how to guide.
(other stories used in this post are my French Cheese story in English and French and my house story in Spanish and French)


